Eligard Dosage
Generic name: LEUPROLIDE ACETATE 7.5mg in 0.25mL
Dosage form: injection, suspension, extended release
Drug classes: Gonadotropin releasing hormones, Hormones / antineoplastics
Medically reviewed by Drugs.com. Last updated on Jan 23, 2024.
Recommended Dosage
ELIGARD is administered subcutaneously and provides continuous release of leuprolide acetate over a one-, three-, four-, or six-month treatment period (Table 1). ELIGARD must be administered by a healthcare provider. The injection delivers the dose of leuprolide acetate incorporated in a polymer formulation.
Table 1. ELIGARD Recommended Dosing
|
Dosage |
7.5 mg |
22.5 mg |
30 mg |
45 mg |
|
Recommended dose |
1 injection every |
1 injection every |
1 injection every |
1 injection every 6 months |
As with other drugs administered by subcutaneous injection, the injection site should vary periodically. The specific injection location should be an area with sufficient soft or loose subcutaneous tissue. In clinical trials, the injections were administered in the upper- or mid-abdominal area. Avoid areas with brawny or fibrous subcutaneous tissue or locations that could be rubbed or compressed (i.e., with a belt or clothing waistband).
Preparation Instructions
Use aseptic technique throughout the procedure. As with other similar agents, the use of gloves is recommended during mixing and administration. Allow the product to reach room temperature before mixing. Once mixed, the product must be administered within 30 minutes or it should be discarded.
ELIGARD is packaged in a carton containing:
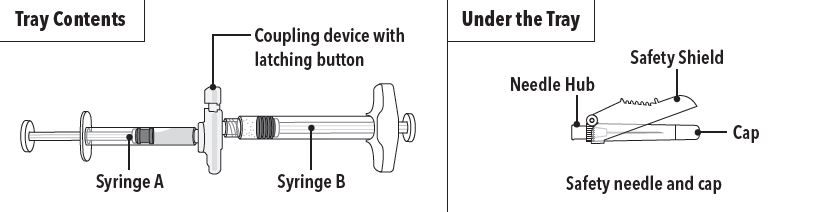
- Tray containing pre-connected syringe system and desiccant pack
- Prescribing information
- Sterile safety needle and cap (located under the tray in carton)
Follow the detailed instructions below to ensure correct preparation of ELIGARD prior to administration:
|
Step 1 On a clean field open the tray by tearing off the foil from the corner and remove the contents. Discard the desiccant pack. Remove the pre-connected syringe system from the tray. Open the sterile safety needle package by peeling back the paper tab. Note: Syringe A and Syringe B should not be lined-up yet. The product should only be administered with the co-packaged, sterile safety needle. |
|
 |
|
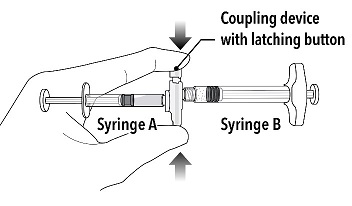
| Step 2
Grasp the latching button on the coupling device with your finger and thumb and press until you hear a snapping sound. The two syringes will be aligned. |
 |
|
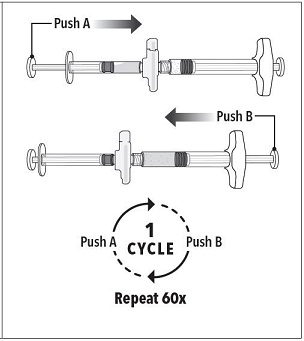
Step 3 Holding the syringes in a horizontal position, transfer the liquid contents of Syringe A into the leuprolide acetate powder contained in Syringe B. Thoroughly mix the product for 60 cycles by pushing the contents back and forth between both syringes to obtain a uniform suspension.
|
 |
|
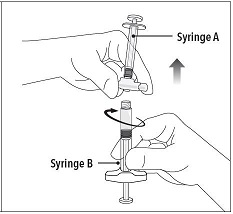
Step 4 After mixing, hold the syringes vertically (upright) with Syringe B (wide syringe) on the bottom. The syringes should remain securely coupled. Transfer all of the mixed product into Syringe B by depressing the Syringe A plunger and slightly withdrawing the Syringe B plunger. |
 |
|
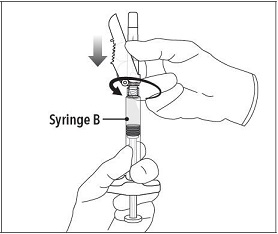
Step 5 While ensuring the Syringe A plunger is fully pushed down, hold the coupling device and unscrew Syringe B. This will disconnect Syringe B from the coupling device. Syringe A will remain attached to the coupling device. Note: Small air bubbles will remain in the formulation – this is acceptable. Do not purge the air bubbles from Syringe B as product may be lost! |
 |
|
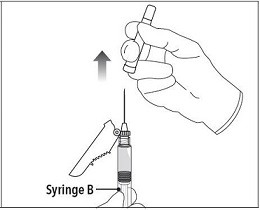
Step 6 Continue to hold Syringe B upright with the open end at the top. Hold back the white plunger on Syringe B to prevent loss of the product and attach the safety needle and cap. Gently screw clockwise with approximately a three-quarter turn until the safety needle and cap are secure. Do not overtighten, as the needle hub may become damaged which could result in leakage of the product during injection. The safety shield may also be damaged if the safety needle and cap are screwed with too much force. |
 |
|
Step 7 Move the safety shield away from the needle and towards the syringe. Pull off the cap immediately prior to administration. |
 |
Note: Should the needle hub appear to be damaged, or leak, the product should NOT be used. The damaged safety needle and cap should NOT be replaced and the product should NOT be injected. In the event of damage to the needle hub, use a new replacement ELIGARD carton.
Administration Instructions
|
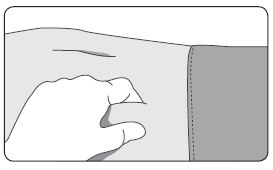
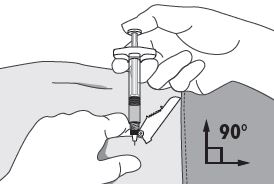
1. Select an injection site on the abdomen, upper buttocks, or another location with adequate amounts of subcutaneous tissue that does not have excessive pigment, nodules, lesions, or hair and hasn’t recently been used. 2. Cleanse the injection-site area with an alcohol swab (not enclosed). 3. Using the thumb and forefinger, grab and bunch the area of skin around the injection site. |
 |
| 4. Using your dominant hand, insert the needle quickly at a 90° angle to the skin surface. The depth of penetration will depend on the amount and fullness of the subcutaneous tissue and the length of the needle. After the needle is inserted, release the skin.
5. Inject the drug using a slow, steady push and press down on the plunger until the syringe is empty. Make sure all the drug has been injected before removing the needle. 6. Withdraw the needle quickly at the same 90° angle used for insertion. |
 |
|
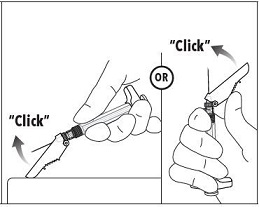
7. Immediately following the withdrawal of the needle, activate the safety shield using a finger/thumb or flat surface and push until it completely covers the needle tip and locks into place. 8. An audible and tactile “click” verifies a locked position. 9. Check to confirm the safety shield is fully engaged. Discard all components safely in an appropriate biohazard container. |
 |
Frequently asked questions
- Are Lupron Depot and Eligard the same drug?
- How long should you take it for?
- Is this a chemotherapy drug?
- How is it injected / administered for prostate cancer?
- Will I get my period while on Lupron?
- What does this drug do for IVF?
- Can you get pregnant on Lupron Depot?
- Is Firmagon (degarelix) the same as Lupron?
More about Eligard (leuprolide)
- Check interactions
- Compare alternatives
- Pricing & coupons
- Reviews (35)
- Drug images
- Side effects
- During pregnancy
- Drug class: gonadotropin releasing hormones
- En español
Patient resources
Other brands
Lupron Depot, Lupron Depot-PED, Camcevi, Fensolvi, Viadur
Professional resources
Other brands
Lupron Depot, Lupron Depot-PED, Camcevi, Fensolvi, Lupron Depot-Gyn
Related treatment guides
Further information
Always consult your healthcare provider to ensure the information displayed on this page applies to your personal circumstances.